Hunt 365 February-Best Archery Sets Part I Reading an Aerial Photo (A version of this article is printed in the February 2016 issue of Iowa Sportsman Magazine)
The lion share of my scouting, scheming, and planning takes place each year in late winter or spring. My mind is always thinking about my hunting grounds and how I can improve them. With each idea though it requires an in person approach (out on the land) to decide if I am really going ahead with them. Ideas that look good on paper won’t always work in the field. Late winter and spring is perfect for this because the woods is very similar to what it was last fall, the weather is moderate making for work that is neither too hot or cold, and any disturbance I make in the deer’s world is as far away from hunting season as possible. In many years this means I’m putting on some miles with my feet starting in February and continuing on through until it’s time for spring food plots in April. For me, on any new farm or even on farm’s I’ve hunted for years, this process starts with a review of the properties aerial photo.
Back in the day, reviewing aerial photos wasn’t always that easy. It was sometimes a chore getting an aerial photo. Today, however, it’s pretty easy. My favorite tool is Google Earth loaded onto my lap top. It’s free (I always like free!) and once you know your way around the software you can look at your hunting grounds, zoom in and out, get elevation reading, distances, plot trails, etc. It really is a pretty cool tool for a land manager. But this article isn’t about Google Earth…it’s about planning out and preparing great archery hunting sets.
Reading an Aerial Photo-Reading an aerial photo for me is about getting the big picture and saving time. I can look at an aerial and determine ahead of time potential areas I can exploit with stand sets. I can plan out wind directions for sets, entrance and exit routes, and the travel routes deer might be taking through that area. If you skip the aerial view step, you sometimes miss the bigger picture and set up on areas that might be good…but not the best. You can do this on your existing hunting grounds to better understand them and on new grounds before you ever step foot on them. I’ll make studying an aerial map my first step every time I plan to hunt new ground. It is especially a great tool when hunting vast amounts of new ground like public hunting areas so that you concentrate your scouting on the most productive areas. I’d like to break down my favorite areas for you when studying these maps.
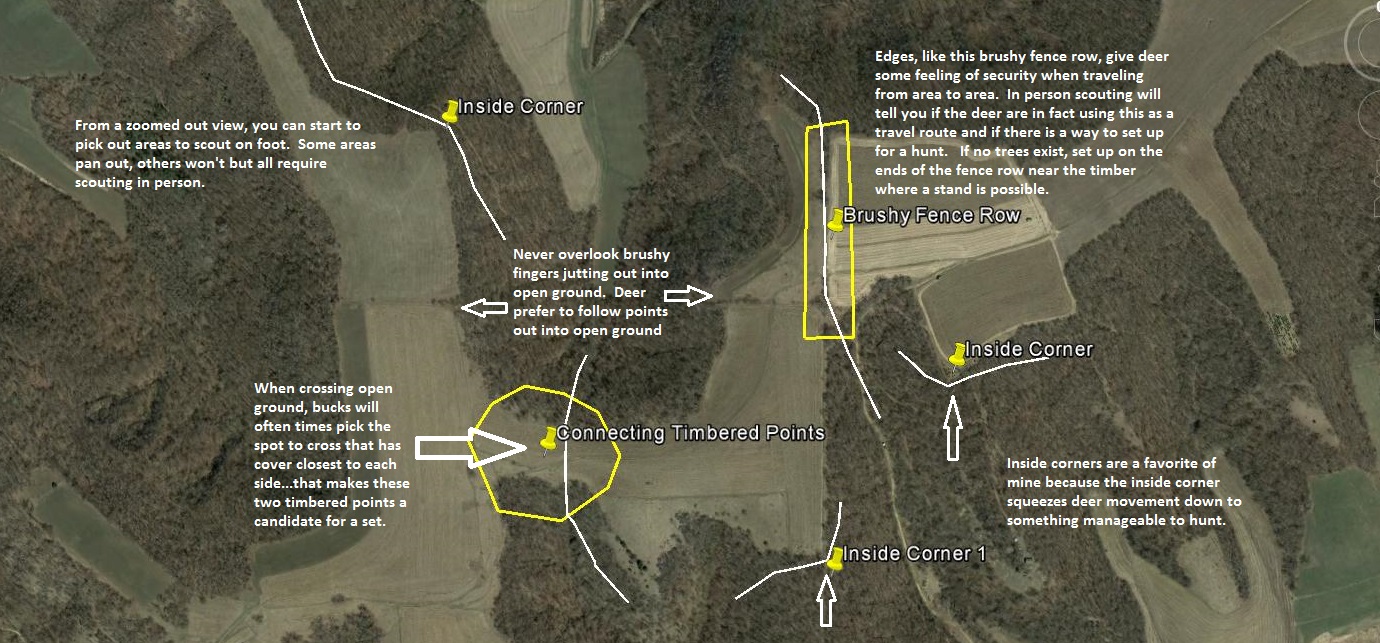
From a zoomed out view, you can easily pick up terrain features like fence rows, inside corners, brushy points, etc.
The Inside Corner-When deer travel throughout their home ranges, they seek the path of least resistance and the path that keeps them the most secure—the path that keeps them in security cover is always the preferred path. This isn’t as important for hunting does because their home ranges are smaller and they move much less than bucks (in terms of distance). Doe family groups typically bed around and very near food and water sources all year. Bucks on the other hand typically bed farther away from their food and water; and during the rut they are obviously traveling throughout their home ranges. This traveling is done in the most efficient way possible and in a way that keeps them secure. An inside corner simply squeezes the security cover down to an inside point. Any deer traveling through the area will prefer to walk on the inside of the timber (or any security cover) over exposing themselves in open terrain like pastures, row crops, or low vegetation fallow ground and CRP. With an aerial photo, it is easy to spot these inside corners. Walking them in person will determine for you if in fact the deer are using these as travel routes and how far off the edge of the open ground they are traveling. Sometimes I find a lot of sign in the form of trails, rubs, and scrapes but not always. The more sign you find the better the corner.
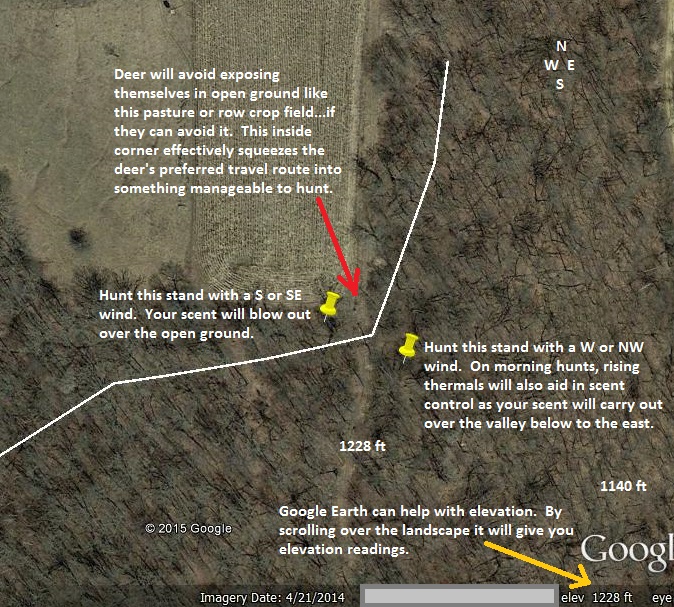
Inside corners are about the easiest features to find and exploit…especially in farm country. In many cases it is possible to hang multiple sets for different wind directions.
The Brushy Fence Row-Deer love to travel edges through open ground. The edge gives them at least some security cover when passing from one piece of timber to another. Brushy fence rows offer deer a way to get from one patch of security cover to another. The thicker and wider the fence row the more deer feel safe around it. Some of my most productive sets in my life have had a brushy fence row in the mix one way or another. Brushy fence rows are not only great for deer traveling parallel to them, but if you find one that is in great shape you can usually located a good fence crossing or jump. This is another squeeze point to narrow down your target area for archery gear. If the fence is in perfect shape, lower the fence or cut an opening in it (if you can) and in no time the deer will use your crossing.
Timbered Funnel-A timbered funnel is simply a stretch of cover connecting two larger pieces of timber or just a stretch of cover through the property that deer can travel and remain in cover. Depending on the scenario, this could make the funnel only a few yards wide to as much as 100 yards wide. What makes a funnel desirable to hunt as an archer is how it narrows down deer movement.
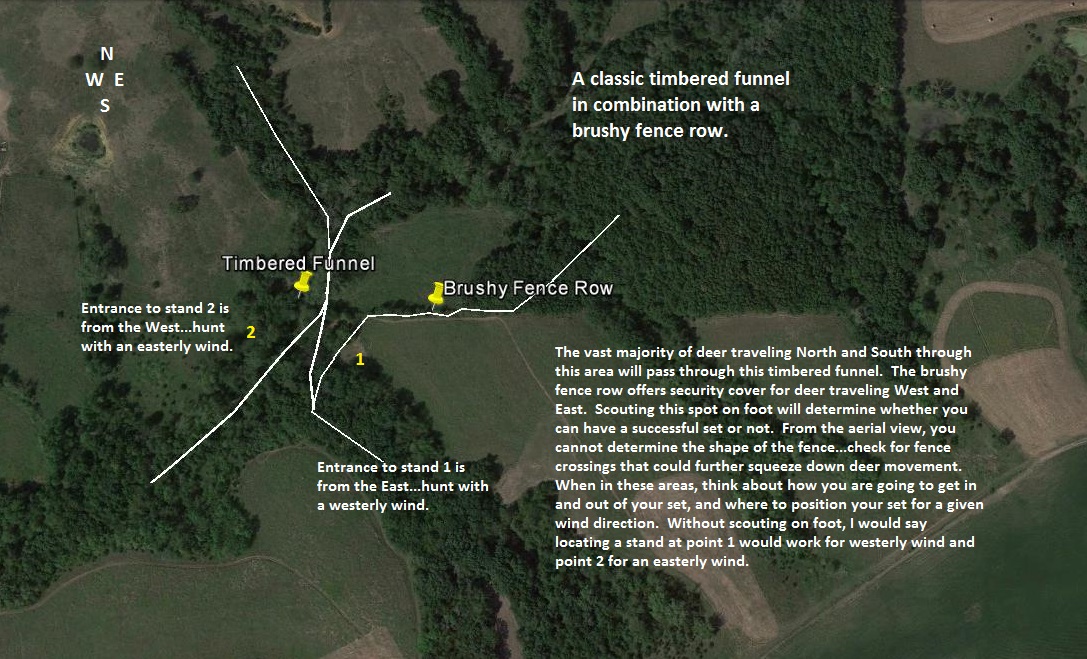
Timbered funnels and brushy fence rows are great places to set up an ambush. In this example, both features exist together making this spot even better. Create a fence jump (March article) and you have an awesome spot!
Connecting Timbered Points-Whenever I see large tracts of open ground, I first look for a timbered funnel or fence row connecting pieces of security cover. In scenarios where this doesn’t exist, many times deer will travel out into open ground by using a point out into the field. Find two points across from each other and it’s even better. This doesn’t have to be timbered points…it can be brushy water ways or small draws with cover in them. These connecting points offer a way for deer to feel more secure longer before exposing themselves in the open. All brushy points jutting out into vast fields can draw more deer attention at times. If they are getting used by the local buck population, expect to find rubs while scouting on foot.
There are other things I might find or look for on an aerial photo but if you start by looking for these 4 points of interest you will be well on your way to finding some great ambush sites that you can simply get into and hang a stand…or better yet develop into very good sets. An aerial photo by itself won’t help you a lot with elevation either, although scrolling on Google Earth will give you a single elevation reading as you move around. A topographic map is best for this—but that’s another article.
Scouting on Foot-When you’ve decided what areas to target based on your study of the aerial photo, you need to get out and do some walking. Use the aerial photo to plan out some sets on a macro level, but figure out the details in person. Before ever hanging a stand, decide how you are going to get in and out of your set without bumping deer. What wind can you hunt your set with? Can you put in multiple stands in the same area to cover more wind directions? Not all spots that look great on an aerial will work once you actually get in there. Don’t talk yourself into something that isn’t there…learn to move on to another spot if you can’t make it work. If it all comes together, don’t stop with the scouting…go ahead and put in your stands because there is no better time to put up your stands and prepare your sets than in late winter or early spring!
In March’s issue, I will continue with more detailed stand sets and how to manipulate your hunting areas to create exceptional ambush spots for the archer.